Quilted Ornaments
The origins of the Quilted ball ornament are hard to find. I am still researching to find the oldest one on record on the internet. But many have childhood memories of these balls hanging on Grandparents or even great Grandparents trees at the holidays. While we live in an age where ornaments can be bought in bulk, bringing a bit of unique and custom ornaments can bring back memories of our older generations making theirs but also making memories for our generations to come.
I hope you enjoy the process of making the quilted balls. I found them to be very addicting. I only planned to make a couple, and I keep finding different fabrics to make into new ornaments.
Items you will need. If you purchased a kit, you should check for each of these items.
- - 3” ball
40 – 2 ½ x 2 ½ cuts of Fabric.
- 8 of the center fabric and 16 each of the other 2
Roughly about 300 pins. You will need pins with a flat head and roughly between 5/8th and 1&1/16th in length. Bead or Sequence pins work great.
Ribbon 5/8th to 1 inch wide, roughly about 15 – 19 inches depending on how long you want your hanger.
Spacer ½ inch wide and roughly about 3 inches in length.

Folding the Fabric
All pieces need to be folded in the following manner.
Take a piece of fabric and fold it in half wrong side (side without print) together. Finger press. Then fold in half again. Finger press. Unfold and use the x created to mark the center of the fabric. Insert the pin into the center of the fabric from back to the front.


Find the center of the ball on directly opposite sides. Mark with a sharpie. Many of the Styrofoam balls have a circle at the center of each side from the manufacturing.

Round 1
With the pin in the fabric, place the first pin in the center point of the ball.


Next you will fold the top left corner to the bottom of the center line. Pin in place and then push flat to pin the point of the triangle as well. Repeat with the Right side.


Once the first one is in place, place the second one direct across from the first. Then fill in the 2 other open slots with fabric folds.

Repeat this same process on the opposite side of the ball. (This is where marking the points help with placement)
Round 2
Choose the fabric of contrasting color from the first round for round 2.
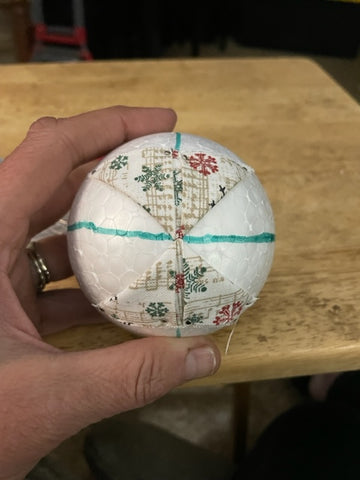
There should now be 8 lines created by the folds of the first round. We will be using these lines for the next round of placement. Using the spacer, mark a spot ½” down from the center point on one of the lines. Following the folding patter above, place the first fabric on the line.
![]()
The next placement will be directly opposite of the first. Then fill in the spaces 90 degrees from the placement. Follow the same pattern for the other 4 lines.


Repeat on the opposite side of the ball.
Round 3
From here, you can make a choice of which pattern you like more for the final design.
Version 1

or
Version 2

Version 1 Round 3
Fold the spacer in half to make it ¼” inch wide and 3 inches long.
Using the same lines and same pattern as round 2, place the spacer from the point of round 2 and pin fabric in place.
Repeat on opposite side of the ball.
Version 2 round 3.
For this round you do not need the spacer. You will use the valley of the triangles from round 2 for the placement. Use the same pattern previously used in round 2. Repeat on the second side.

Note: I do like to do one side as version 1 and one side as version 2. I think it just gives the ornament a different feel.
Placing the Ribbon
Using the ribbon, wrap around the ornament hiding the pins from Round 3. Pin into place. Using the rest of the ribbon, create a loop and pin into the ball at the seam of the ribbon around the ball. I used 4 pins in a square to hold the loop to the ball.
Embellish as desired. Many use small pearl beads through the pins at each of the peaks and valleys. I have also seen many using “ricrac” or decorative ribbons around the ornaments before placing the final ribbon for hiding pins. Some people are great at making a flower or bows at the top of the ornament before placing the hanging ribbon in place.
I really hope you enjoy making these ornaments. Please feel free to reach out if you have any questions. There are also many YouTube videos on the process if you prefer to watch a video for directions. Each of them might be slightly different but the concepts are roughly the same.